Paint a Watercolour Floral with Teneal Kotzé
What you will need:
- X1 Brush – Prime Art Bianco R12
- X1Sheet of Paper – Primeart multi-media pad (300gsm)
- Watercolour Set – MUNGYO, Professional Water Color 24 pan set
- Water cup
- Paper towel to clean your brush
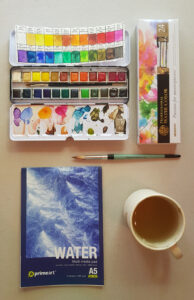
Note: With the watercolour set, I switched around the original order of the colour pans. I also created a little colour swatch that I keep in my Watercolour set. So I know what colours to expect when I paint.
Steps to painting a Watercolour Floral:
Step 1: Make sure you are comfortable and that all of your materials are ready and placed in front of you.
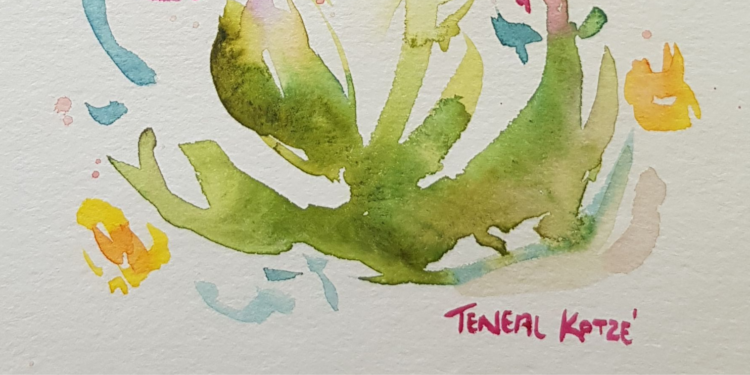
Step 2: Start by wetting your brush and applying Olive Green. Draw/paint some simple leaves and stems. I recommend using easy shapes as this will make the process easier. This is the base of the artwork, and from here, we will be able to see how the rest of the artwork will take shape. Keep this base light so that there is a playroom to add some extra colours.
Step 3: Clean your brush with water and apply it to the Prussian Blue colour pan. With your brush saturated with colour, choose some spaces within the Olive green stems and leaves you would like to darken. Apply the colour to these areas and allow the watercolour and water to flow naturally. The thing I like the most about watercolour is the song and dance between the colour and water. There is no precise way to do it.
Step 4: Use Cold Pink and Permanent Rose together for your flowers. I’ve switched around my colour pans, so these two are next to each other in my tray. If yours are not together, mix them on the mixing surface. As with the stems and leaves, draw the flowers in the desired form. I went for an almost Lavender form as the brush I am using naturally created this shape. Stick with simple and short brush strokes when using watercolour. Repeat these flowers where you see fit.
Step 5: Mix Orange and Vermillion to create small buds throughout the artwork. These are done with very small quick strokes with the brush.
Step 6: To create more depth within the flowers, apply Permanent Violet. To achieve the best results is to apply it within the areas that are still wet with Cold Pink and Permanent Rose. This way, the water and watercolours will naturally create an interesting colour variety.
Step 7: Mix Lemon Yellow with Yellow. The idea here is to go over those previously created orange buds and give them a better form. Allow the Orange and Yellow to mix when painting some quick, easy flowers.
Step 8: For our final step, we want to bring the whole artwork together and get rid of some of the awkward white spaces showing through. Mix Light Red and Permanent Red together, but make sure to dilute them with enough water. With the brush full of water and paint, hold it up to the artwork and make splatters. Make sure not to overdo it. I recommend about two to three, depending on how dark the splatters turn out on the paper.
When creating a Watercolour artwork, it is important to remember that watercolour is not rigid and always predictable. The great thing about the medium is to allow it to flow and move on its own. Sometimes the most interesting marks and shapes happen when we don’t try to manipulate the image too much. I hope you have fun and remember to PLAY!