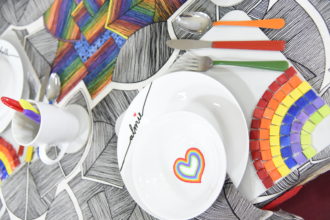
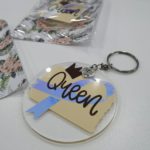
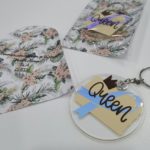
Breast Cancer Awareness Month – Always Remember that you are A Queen Keyrings
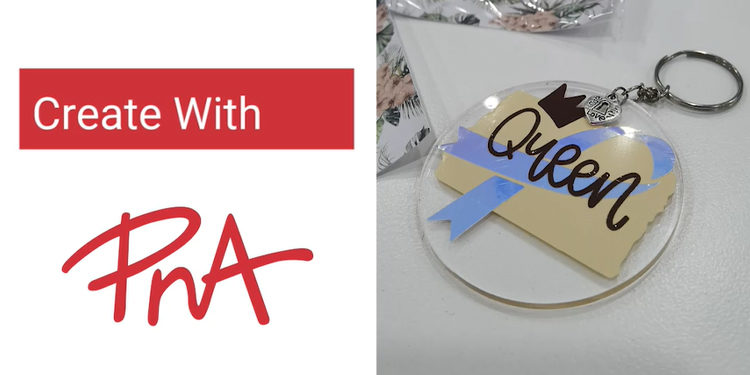
The Cricut Maker is a wonderful machine to use in bringing any of your designs and ideas to life. Design Space is the software that works with any of the Cricut machines. You will find thousands of ready to make projects as well as images and fonts to choose from. As it is October and Breast Cancer Awareness month, I have chosen to make an inspirational keyring, the Queen Keyring, which is a great inspiration gift to give your loved ones of any women really.
For this project, you will need the following:
- Cricut Maker
- Cricut Light Grip Mat & Standard Mat
- A measuring tape (this is a key tool to have)
- Cricut Permanent Vinyl Holographic – any colour or any other vinyl of your choice, I have used Opal
- Cricut Permanent Vinyl – any colour of your choice, I have used Parchment and Coffee colours
- Cricut Transfer tape
- Cricut Ultimate Fine Point Pen Set – I have used the Moccasin colour
- Cardstock – any colour or print of your choice
- Ready cut Acrylic circles – 6cm circumference
- Key ring findings – keyring piece
- Small Charm – any of your choice
- Scissor
- Masking Tape
Here are the steps to follow in making the Queen Keyring:
- Open and switch on your machine and well as open Design Space
- Click New Project in Design Space and save the project if you would like to use it in the future. New Project will open a new Canvas for you to work in.
- Design Space has various menus and functions, the best way to learn to click and try them or look up how each one works. You can always click the undo button if you make a mistake and want to try something else.
- Starting with designing the Keyring Display Card, if you cannot find a card design within Design Space then you can easily search for free ones on the web, download them as PNG or SVG files. I have used one I found and downloaded then uploaded it into Design Space and added it to the Canvas.
- Size the card to about 8cm wide x 12cm tall/long.
- Add text using the ‘Text’ button in the left hand menu. Find a ‘writing’ text that you like (there are hundreds to choose from, you can filter by choosing ‘Writing’). I have chosen the Be Mine text. Size you text to fit within your card outline, I have used 6.891cm wide by 2.437cm high/long. The texts reads, ‘Remember…whatever you go through, You will always Be A QUEEN.
- Select the card outline and text together and ‘Group’ using the ‘Group’ function on right hand menu. Also click ‘Attach’ which will affix the design to the mat exactly where you have positioned it so that it also cuts in the same position on the mat.
- On to the Keyring, start by adding the shape of the acrylic keyring piece you are working with. Having an exact visual of what you are designing helps with seeing what your design looks like before you make it. Add the Circle shape to you canvas and resize to 6cm wide by 6cm high. Change the colour to white, so that you just have an outline of a circle.
- Next design the vinyls, add the brush stroke design. If you cannot find a suitable brush stroke or splash image then you can search find frees ones to use on the web. Download as PNG or SVG files and then upload to Design Space. Design Space will always guide you and if you get stuck or don’t understand what it requires then just google, or ask on the Cricut South Africa Facebook Group, there is always an answer and help out there. I found a number of brush stroke images which I then saved and uploaded onto Cricut and then added them to the canvas. I deleted the ones I did not want and resized the one I wanted to use to 5.622cm wide by 4.779 cm high/long. Change the colour to cream (or to the colour of whatever vinyl you have chosen). Place within the circle shape.
- For the cancer ribbon, click images and search the word ‘cancer ribbon’, I used the Cancer Ribbon 1. You can use what you like or search through the thousands of images available to use on Design Space, you can also search using the word/name of what you are searching for. Add to canvas and resize to 3.166cm wide by 5.731cm high/long. Change the colour to Opal/Pink (or whatever colour of vinyl you have chosen). Place within the circle over the brush stroke.
- Next, click images and search for ‘Queen with Crown’. Add to canvas and resize to 5.07cm wide by 2.748 high/long. Change the colour to brown (or whatever colour of vinyl you have chosen). Place within the circle over the brush stroke and ribbon.
- Delete the circle chape.
- Prepare your correctly sized (size your pieces slightly larger than your design) pieces of cardstock and vinyl. Place your cardstock on one mat and your various pieces of vinyl on another made. Place your pieces of vinyl next to each other noting where they begin and end on the mat to that you can place the designs along the same areas on the mat in Design Space.
- Pick the appropriate colour pen from the Ultimate Fine Point Pen Set. I have chosen Moroccan. Place it in the pen holder of the Cricut Maker machine. You fine point blade will already also be in the machine (if not then place it into the relevant place on the machine).
- Click Make IT
- Cricut will split the designs and place on different mats based on the various colours you have chosen, if you do not want this and want the vinyls on one mat, change the colour of your designs to just one colour such as white or black. Alternatively, when you click ‘Make It’, and get to the screen with the various mats, you can ‘move’ you designs from one mate to another.
- In Design Space, Click ‘Continue’ and choose Cardstock Medium. And follow the prompt on both Design Space and the Cricut Maker, load the mat with the cardstock for the Keyring Display Card and watch with a smile as the machine cuts out the design.
- When done, offload the mat.
- Design Space is now ready to cut the vinyl BUT you need to change the material option from cardstock to vinyl, to do so, click the down arrow in step one where you choose the material and material options will show, choose ‘Vinyl’ and follow the prompts to load your mat and begin the cut.
- Watch with a smile as the Cricut Maker cuts your vinyl (takes less than 1 minute 😊).
- Click Finish and you are done
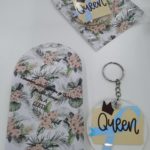
- You can then remove your card and vinyl from the mat. For the vinyl, you can weed and prepare your pieces in a variety of ways, choose what works for you or follow as per the video.
- Using your transfer tape layer your vinyl onto the acrylic piece one at a time, positioning them where you like them.
- Assemble your keyring attaching the keyring to the acrylic as well as the little charm. Place onto your display card and you are done.
I hope you enjoyed making this easy project and I know whoever receives your gift will receive it with joy and a smile and will be inspired to continue being the Queen that they are.
Bring your creativity and ideas to life with Cricut available from select PNAs store nationwide.
Thank you
Joan (@JemsOfANatural).

About me:
Joan Hillman is a natural hair community builder passionate about natural hair, self love and acceptance, Cricut and empowering others through hair and creativity. She makes and sells hair, woman and Africa inspired earrings and accessories and merge her concepts and ideas with anything hair and upliftment supporting all women that she comes into contact with. Women are natural creators, creating in all aspects of their lives from meals to make up to bringing up their children, Cricut inspires new ideas and allows those ideas to come to life, allowing all women to fully embrace the creators that they are.
Find Joan @JemsOfANatural on IG, Facebook and Twitter or visit www.jemsofanatural.com