Hello Sunshine Illustration by Glenda
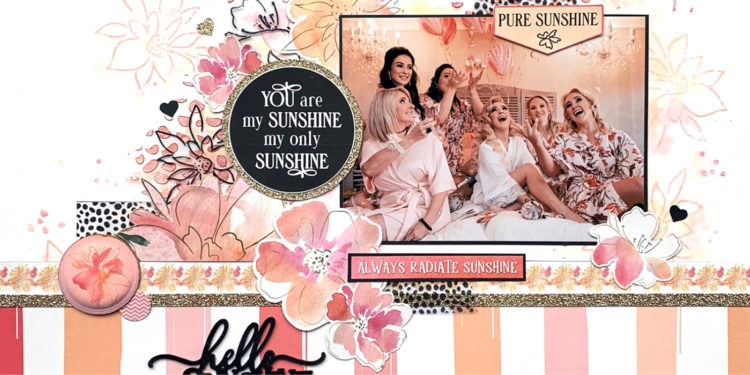
Your eyes will be glued to the screen when you start to watch Glenda Viljoen from Penelope Dee creating this Hello Sunshine illustration! ☀️
CUTTING LIST (All measurements supplied are width by height)
- PENELOPE DEE ALYSSIA PAPER
- KINDNESS: VERTICAL STRIPES 30,5 X 11CM [A]
- DAYDREAM: BARCODE: FLORAL [B] | MAT PHOTO AND ‘ALWAYS RADIATE SUNSHINE’
- CHEERFUL: FUSSY CUT THREE FLORALS | WORDS OF CHOICE | CIRCLES: FLORAL (1”) AND ZIG ZAG (½“)
- NATURAL: FUSSY CUT FLORALS
- EMBELLISH-IT SHEET
- YOU ARE MY SUNSHINE CIRCLE: Punch 2¼“ circle from gold glitter cardstock and adhere 2” punched ‘YOU are my SUNSHINE…’ circle centred on gold glitter circle.
- LARGE CIRCLE BUTTON: Punch large 1¼” circle button.
- ZIG ZAG CIRCLE: Punch ½“ circle
- GOLD GLITTER CARDSTOCK: 30,5 x 0,5cm
PRODUCT AND TOOL REQUIREMENTS
- WENDY VECCHI MAKE ART STAY-TION (OPTIONAL)
- HEAT TOOL
- WATER SPRITZER
- CIRCLE PUNCHES: 2¼“, 2”, 1¼” AND ½. “
- NON-STICK CRAFT SHEET
- DISTRESS OXIDE INK PAD: TATTERED ROSE, WORN LIPSTICK, SCATTERED STRAW
- WATER BRUSH (FINE TIP)
- DYLUSSIONS ACRYLIC PAINT: BLACK MARBLE
- RANGER INK BLENDING TOOL WITH FOAM
- PENELOPE DEE ALYSSIA FLORAL STAMP SET
- PENELOPE DEE ALYSSIA DOT STENCIL
- ACRYLIC BLOCK: 6 X 6CM
- NUVO EMBELLISHMENT MOUSSE: FRENCH ROSE, CORAL CALYPSO, PEONY PINK
- PALETTE KNIFE
PHOTO REQUIREMENTS: LANDSCAPE:12 x9cm
LAYOUT INSTRUCTIONS
CHIPBOARD WORD SENTIMENT: HELLO SUNSHINE
Apply Black Marble Dylusions Acrylic Paint with an ink blending tool and foam to chipboard sentiment. Heat set.
BACKGROUND
- Place white cardstock on Wendy Vecchi Make Art Stay-tion. Apply Tattered Rose Distress Oxide Ink to large floral stamp and stamp on white cardstock as per layout image. Heat set. Repeat with a smaller floral stamp.
- Place and secure stencil as per layout image with magnets on Make Art Stay-tion and apply Nuvo Embellishment Mousse (three colours) with a palette knife, blending colours. Heat set.
- Swipe Tattered Rose, Worn Lipstick and Scattered Straw Distress Oxide Ink on a non-stick craft sheet and lightly spritz with water.
- Pick up colour with a waterbrush to apply colour to stamped flowers, allowing ink to run through stencilled areas. Heat set.
LAYOUT
- Adhere striped paper ‘KINDNESS’ [A] centred on white cardstock, aligning bottom edges.
- Adhere DAYDREAM floral barcode strip [B] along the top edge of stripe KINDNESS. Adhere gold glitter strip over the join.
- Adhere polka dot transparent ‘washi tape’ strips as follows:
– Adhere one piece of polka dot ‘washi tape’ 4cm from left and 13,5cm from bottom edges.
– Adhere second polka dot ‘washi tape’ 8,5cm from right and 7,5cm from top edges.
– Adhere third polka dot ‘washi tape’ 12cm from right and 10,5cm from bottom edges. - Adhere fussy cut CHEERFUL yellow flower [1] 14cm from right and 5,5cm from top edges. Adhere photo 4,5cm from right and 13cm from bottom edges. Adhere ‘PURE SUNSHINE’ EMBELLISH-IT tab to top edge of the photo.
- Adhere fussy cut NATURAL half flower [2] along the top edge of floral DAYDREAM barcode, 5cm from left layout edge. Adhere 1¼“ large floral EMBELLISH-IT button to left of flower on barcode strip. Adhere small punched circle to the bottom right of the button.
- Adhere fussy cut CHEERFUL pink coral flower [3] 3,5cm from the button, on barcode strip. Adhere small NATURAL flower [4] to the bottom right of the flower. Adhere ‘ALWAYS RADIATE SUNSHINE’ with foam 9,5cm from right and 11,7cm from bottom edges.
- Adhere fussy cut CHEERFUL gold line flower [5] to the bottom right corner of photo, overlapping onto floral barcode strip.
- Adhere fussy cut NATURAL pink flower [6] 7cm from left and 9,5cm from top edges.
- Adhere ‘You are my SUNSHINE…’ glitter circle 8,5cm from left and 9,5cm from top edges.
- Adhere chipboard ‘hello SUNSHINE’ 6,5cm from left and bottom edges.
- Adhere two other word sentiments cut from the text side of KINDNESS. Adhere two small gold glitter hearts below sentiments.
- Adhere 1” epoxy dome on punched CHEERFUL circle [7] and adhere 8cm from left and 1,5cm from top edges. Alternatively, apply Ranger Glossy Accents and set aside to dry
- Complete layout with additional embellishments as desired.