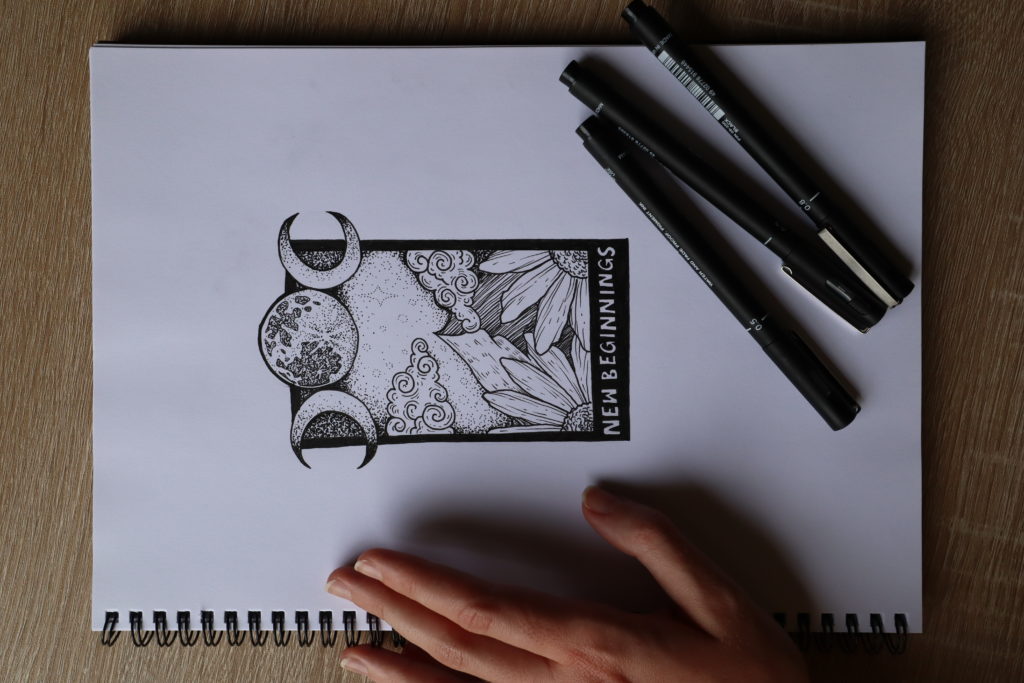
Shade with Shelby Downey
Want to know how to shade? Follow these steps as Shelby Downey shows us just how simple it is.
What you’ll need:
0,8 fineliner
0,5 fineliner
0,3 fineliner
0,1 fineliner
0,5 clutch pencil and
eraser putty
Step 1:
You need to start off by drawing a rough shape of a card using the clutch pencil, and then a small border on the sides of the shape with a slightly thicker border at the bottom on the card for the writing that will come later.
Step 2:
Start drawing your elements into the card shape. Try and almost “collage” them over the shape to create contrast and some depth. Don’t feel like you need to just draw within the lines.
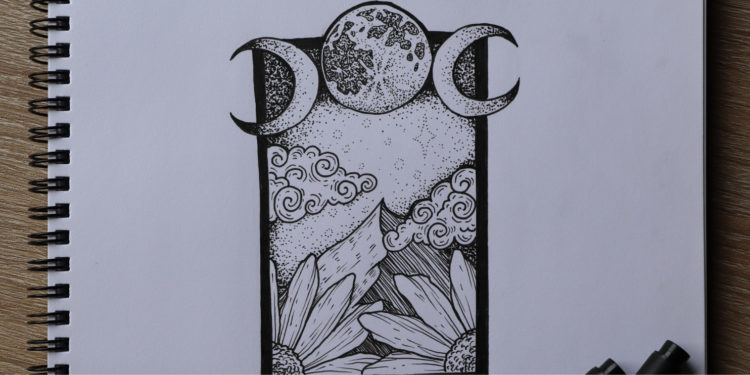
Draw three rough circles at the top as they will be three moon phases. Remember, you don’t have to be perfect; art is about creating and expression.
Start roughly drawing the flowers at the corner of the borders, do this by making a rough circle and then adding petals onto it. Remember that flowers are natural, the more imperfect they are, the more real they are.
Add the mountain above the two flowers, draw two diagonal lines (make sure the lines are too straight, as it needs to look natural) and where they meet in the middle, draw a jagged line down.
Now you need to draw the clouds. Use continuous semi-circle almost bubble shapes in different sizes, again, the more imperfect, the better.
Step 3:
Now that the first rough pencil layer is down, you need to go over it and refine it more.
Start adding swirls to the clouds, do this by flowing the bump’s outer line and curl the line into the cloud. You make to make little spirals with the clouds
Start marking the details in the centre moon. This will help later when you have to shade it in. Again, the more natural-looking, the better, so don’t try to get the markings too perfect. Make little craters and just have fun with it.
The mountain needs some detail now, start making the mountain look a bit more rough-edged. Use some jagged lines to show some cliff faces. Lightly shade in the one side using some diagonal lines to show where the shadow on the mountain would be.
Write whatever you want the card to say or be about in the bottom box of the card.
Step 4:
Now it’s time to use the fineliners!
Take the 0,5 fineliner and start adding some detailing into the flowers’ centre using little squiggly lines, remember, the more imperfect and random the better.
Outline the moon detailing and start stippling (dotting) with a 0,3 or 0,1 fineliner, inside the marking you just made. The closer the dots, the darker it will appear, the further the dots, the lighter the shading will appear.
Start adding stippling to the crescent moons, start dotting really compact in the corners and go further away to create a fading effect as you get more to the centre.
Take your 0,1 and draw lines inside the flower petals to create some folds and texture. Don’t draw the lines all the way, and give some variety to the line lengths, you can even add some dots or dashes after the lines end.
Add little lines and swirls into the clouds to help give it the illusion that it is swirling. Follow your swirl directions of the outer lines.
Draw the solid lines on the mountain’s shaded part and small little lines to show some texture on the opposite side.
Don’t be afraid to go back and add more dots or lines later.
Step 5:
Now it’s time for the sky, start off marking where you want the stars to be using little dots. For bigger stars make a diamond shape, and for smaller stars make a circle using dots.
Start at the corner and begin stippling; this part will take some time. Dot really closely in the corners and around the elements, and then fade it out by dotting slightly further and further away.
Step 6:
Write your card’s title in the bottom border to make it neater with a pencil (or if you want to change it as I did) and then outline it with the fineliner. Once outlined, colour the rest of the border in black.
The final touches! Now you’re almost done, you can look at it and see if it needs any more little dots or lines, details or shading… and then add them in. Have fun with it and don’t overthink it.
Erase all the pencil marks gently, and then you are done.