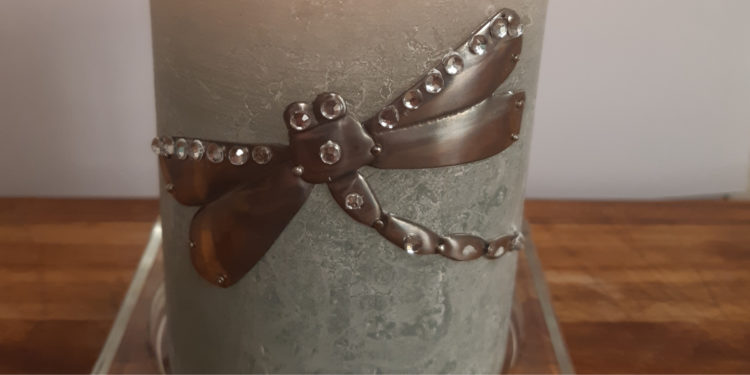
Pewter Dragonfly Candle by Sandy Griffiths
Sandy Griffiths from Sandy Craft Studio in Cape Town specialises in the art of fewter embossing. Follow this quick 15-step tutorial on how to create a pewter dragonfly candle.
You will need
- Small piece of pewter and a candle
- design traced onto tracing paper
- Masking tape
- Small ball tool
- Paper stub
- Needlepoint cutter and cutting mat
- 2 pieces of felt
- Piece of cardboard with no texture
- Beeswax and glass dropper
- Turpentine
- Cottonwool
- Baby powder
- Patina
- Craft pins
- Clear spray varnish
- Small rhinestones and glue
How to Create
This stylish little dragonfly is placed onto the candle using craft pins; this means it can be transferred to a new candle once this one has burnt down.
Method
- Place pewter onto cardboard, masking tape in place.
- Place traced design over pewter, mask in place.
- Using the small ball tool, trace the entire design.

4. Remove tracing paper and all masking tape.
5. Turn pewter over, place onto two pieces of felt, using the paper stub emboss one wing of the dragonfly.

6. Turn pewter over, right side up, and place onto the cardboard.
7. Draw around the edge of the wing with the paper stub and then small ball tool.


8. Repeat steps 5, 6 and 7 to emboss each section of the dragonfly.
9. Using the glass dropper, fill the back of the dragonfly with melted beeswax, allow to cool.


10. Clean the front with turpentine on cotton wool, then clean with baby powder on cotton wool.
11. Apply patina with a piece of cotton wool.

12. After 4 minutes of polish off using Metal Polish on cotton wool.

13. Place the pewter design onto a cutting mat and cut out the dragonfly using the needlepoint cutter.

14. Seal with clear varnish, leave to dry.
15. Glue the rhinestones into position, leave the glue to dry.
16. Using the craft pins, secure onto the candle.

Follow Sandy on:
Facebook: @sandycraftstudio